C# Script를 이용하여 Visual Studio에서 캐릭터의 좌우 움직임을 줄 예정이다. 이전에 스크립트 생성과 C# Script를 이용하기 위한 Visual Studio 연동에 대해 알아보자
1. C# Scripts 생성
Assets에서 Scripts폴더를 생성한 후 폴더에서 우클릭 -> Create -> C# Script를 만들어준다.

C# Script를 생성했다면 더블클릭하여 Visual Studio를 실행해준다. 만약 Visual Studio가 설치되어있지 않다면 설치해주도록 하자. (대부분 Unity설치 과정에서 설치됨)
C# Script를 이제 캐릭터에 적용시켜주자 그대로 드래그 앤 드롭으로 캐릭터에 Script를 적용시켜주면 된다.

2. Unity와 Visual Studio 연동
Unity와 Visual Studio를 연결하여 써야 하는데 연결 방식은 다음과 같다.
Edit -> Preference -> External Tools 탭 -> External Script Editor 탭에서 Visual Studio를 선택해주면 설치된 Visual Studio와 연결이 된다.


3. 캐릭터 움직임 C# 코딩
using System.Collections;
using System.Collections.Generic;
using UnityEngine;

public class Rtan : MonoBehaviour
{
    // Start is called before the first frame update
    void Start()
    {

    }

    // Update is called once per frame
    void Update()
    {

    }
}
처음 들어가면 위와 같은 형태를 띈다. 여기서 Start와 Update가 있는데, Start는 스크립트가 실행될 때 한 번 실행되는 함수이며 Update는 매 프레임마다 실행되는 함수이다.
현재 우리는 캐릭터를 좌 우로 움직이는 코드를 짜고있기 때문에 Update에서 위치 변화를 주면 된다.
그럼 Update에 다음과 같은 코드를 추가해보자
transform.position += new Vector3(0.05f, 0, 0);
transform.position 은 게임 오브젝트의 절대좌표를 나타내는 것이며 Vector3를 먹여주면 해당 위치로 이동한다는 뜻이다.
매개변수는 각각 x, y, z축 이며 우리는 x축방향으로 좌우 이동하는 캐릭터를 만들어줄거기 때문에 x축에 0.05f를 넣어주자.
+= 하여 오브젝트에 계속 x축을 더해줌으로써 마치 이동하는 것처럼 보이게 만들어준다.
using System.Collections;
using System.Collections.Generic;
using UnityEngine;

public class Rtan : MonoBehaviour
{
    float direction = 0.05f;
    // Start is called before the first frame update
    void Start()
    {

    }

    // Update is called once per frame
    void Update()
    {
        transform.position += new Vector3(direction, 0, 0);
    }
}
코드를 입력했다면 Unity 상단의 중간에 보면 재생과 일시정지버튼이 있다. 재생버튼을 주르게 되면 캐릭터가 앞으로 쭉 달려갈 것이다.
캐릭터의 이동이 빠를 경우
너무 빨리 지나간다 싶으면 Fixed Update를 사용해 보자.
FixedUpdate() - 프레임을 기반으로 호출되는 Update 와 달리 Fixed Timestep에 설정된 값에 따라 일정한 간격으로 호출된다. 물리 효과가 적용된(Rigidbody) 오브젝트를 조정할 때 사용된다.(Update는 불규칙한 호출임으로 물리엔진 충돌검사 등이 제대로 안될 수 있음)
using System.Collections;
using System.Collections.Generic;
using UnityEngine;

public class Rtan : MonoBehaviour
{
    float direction = 0.05f;
    // Start is called before the first frame update
    void Start()
    {

    }

    // Update is called once per frame
    void Update()
    {

    }
    void FixedUpdate()
    {
        transform.position += new Vector3(direction, 0, 0);
    }
}
4. 캐릭터 좌 우 움직임
그런데 캐릭터가 앞으로 쭉 가면서 화면 밖으로 나가는 모습을 볼 수 있을 것이다. 캐릭터가 좌 우로 이동하려면 어떻게 해야 하는지 잘 생각해보자.
우측 끝까지 갔다가 벽을 만나면 반대편으로 가게끔 해줘야 하기 때문에 우측 끝 좌표에서 캐릭터를 반대로 오게끔 해주면 된다.
그렇다면 우측 끝 좌표는 어떻게 알 수 있냐인데 이는 Debug.Log 함수를 이용하면 된다.
Debug.Log는 말 그대로 Console창에 Log를 띄워주는 역할을 한다. 이를 통해 캐릭터의 위치를 Log로 띄워주고 벽에 닿는 순간 그 좌표에 충돌할 경우 반대편으로 가게끔 해주면 된다.
Debug.Log(transform.position.x);위 코드를 Update에 적용시켜 주고 다시 실행해보도록 하자
그러면 아래 사진과 같이 Log가 뜰것이다.
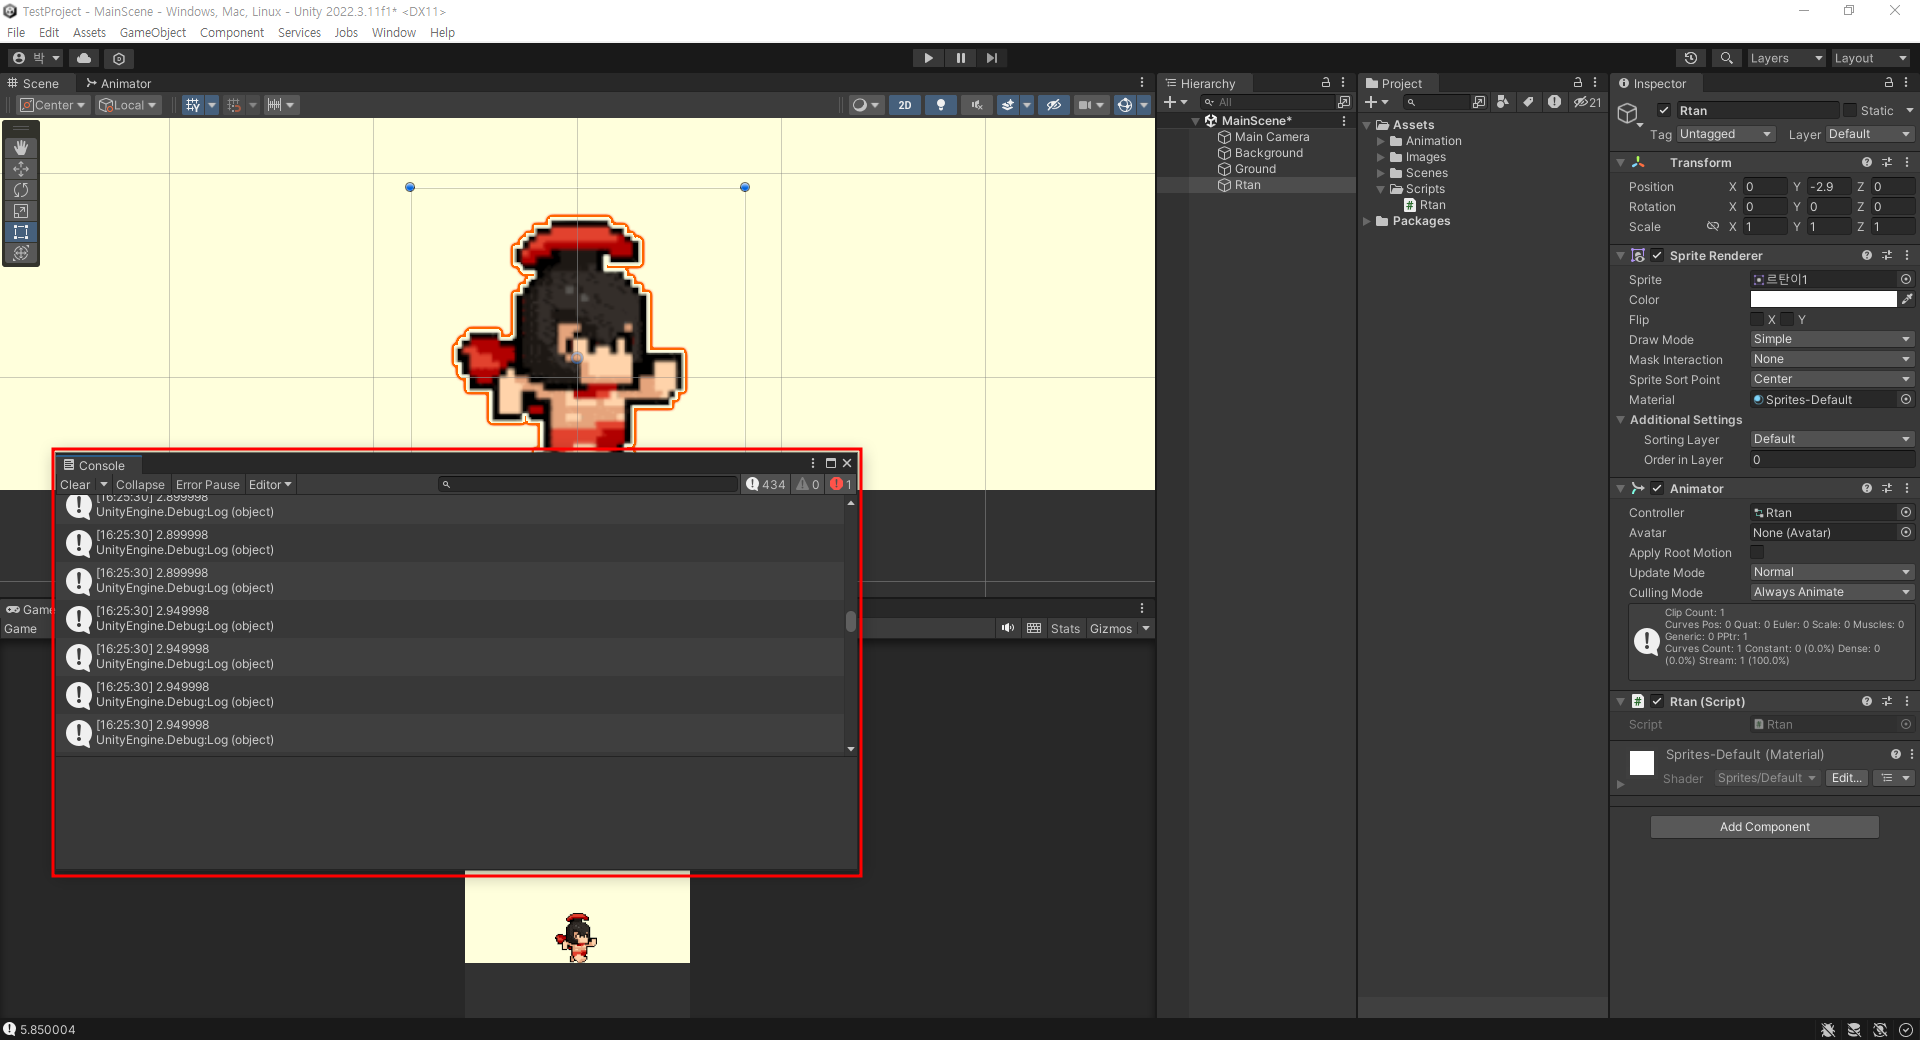
어림잡아 벽에 닿을 때 위치가 2.8정도 되니 만약 캐릭터의 위치가 2.8보다 크다면 반대방향으로 돌게 하라는 코드를 짜면된다.
즉 if문을 이용해 캐릭터가 충돌시 반대로 돌게끔 해주도록 하자
using System.Collections;
using System.Collections.Generic;
using UnityEngine;

public class Rtan : MonoBehaviour
{
    float direction = 0.05f;
    // Start is called before the first frame update
    void Start()
    {

    }

    // Update is called once per frame
    void Update()
    {
        if(transform.position.x > 2.8f)
        {
            direction = -0.05f;
        }

        // Debug.Log(transform.position.x);
    }
    void FixedUpdate()
    {
        transform.position += new Vector3(direction, 0, 0);
    }
}
물론 반대편도 마찬가지로 else if 를 넣어 해주도록 하자. 미리 direction이라는 변수를 만들어 0.05f 를 초기값으로 설정하고 벽에 부딪혔을때 반대값을 줘 반대방향으로 이동하게 하는 코드이다.
using System.Collections;
using System.Collections.Generic;
using UnityEngine;

public class Rtan : MonoBehaviour
{
    float direction = 0.05f;
    // Start is called before the first frame update
    void Start()
    {

    }

    // Update is called once per frame
    void Update()
    {
        if(transform.position.x > 2.8f)
        {
            direction = -0.05f;
        }else if(transform.position.x < -2.8f)
        {
            direction = 0.05f;
        }

        // Debug.Log(transform.position.x);
    }
    void FixedUpdate()
    {
        transform.position += new Vector3(direction, 0, 0);
    }
}
5. 캐릭터의 좌 우 반전
가만보면 캐릭터가 좌 우로 이동하기는 하지만, 방향을 바꾸지는 않고 앞만 보면서 앞 뒤로 움직이는 느낌을 준다. 이럴 때 transform.localScale 함수를 이용해 캐릭터가 보는 방향을 바꿔 줄 수 있다.
transform.localScale 함수는 크기를 바꿔주는 함수인데 x축을 -1값으로 준다면 마치 반대방향을 보는듯한 느낌을 줄 수 있다.
최종 코드는 아래와 같다.
using System.Collections;
using System.Collections.Generic;
using UnityEngine;

public class Rtan : MonoBehaviour
{
    float direction = 0.05f;
    float toward = 1.0f;
    // Start is called before the first frame update
    void Start()
    {

    }

    // Update is called once per frame
    void Update()
    {
        if(transform.position.x > 2.8f)
        {
            direction = -0.05f;
            toward = -1.0f;
        }else if(transform.position.x < -2.8f)
        {
            direction = 0.05f;
            toward = 1.0f;
        }

		transform.position += new Vector3(direction, 0, 0);
        // Debug.Log(transform.position.x);
    }
    void FixedUpdate()
    {

        transform.localScale = new Vector3(toward, 1, 1);
    }
}
우측 벽에 닿았을 때 direction을 -0.05f 를 먹여 반대방향으로 이동하게 함과 동시에 toward 는 -1.0f를 먹여 반대방향으로 이동하게끔 보여주는 역할을 한다.

6. 마우스 클릭시 좌 우 변경
마우스 클릭시 방향바꾸는 이벤트는 Input.GetMouseButtonDown 함수를 이용하면 된다.
GetMouseButton 이벤트들의 차이는 아래와 같다.
- Input.GetMouseButton : 마우스 버튼을 누르는 동안
- Input.GetMouseButtonDown : 마우스 버튼을 누른 순간
- Input.GetMousebuttonUp : 마우스 버튼을 눌렀다 때는 순간
즉, 우리는 마우스 버튼을 누른 순간이 필요하기 때문에 Input.GetMouseButtonDown 함수를 통해 누를 때 마다 캐릭터의 방향을 바꾸게끔 설정해주도록 한다.
if (Input.GetMouseButtonDown(0))
{
    toward *= -1;
    direction *= -1;
}
함수 내의 매개변수 0, 1, 2 는 각각 마우스 왼쪽버튼, 오른쪽버튼, 휠버튼으로 나뉜다. 우리는 좌클릭시 방향전환 코드를 짜고있기 때문에 0으로 해주자.
마우스 이벤트를 추가한 최종 코드
using System.Collections;
using System.Collections.Generic;
using UnityEngine;

public class Rtan : MonoBehaviour
{
    float direction = 0.05f;
    float toward = 1.0f;
    // Start is called before the first frame update
    void Start()
    {

    }

    // Update is called once per frame
    void Update()
    {
        if(Input.GetMouseButtonDown(0))
        {
            toward *= -1;
            direction *= -1;
        }
        if(transform.position.x > 2.8f)
        {
            direction = -0.05f;
            toward = -1.0f;
        }else if(transform.position.x < -2.8f)
        {
            direction = 0.05f;
            toward = 1.0f;
        }

        transform.localScale = new Vector3(toward, 1, 1);
        // Debug.Log(transform.position.x);
    }
    void FixedUpdate()
    {
        transform.position += new Vector3(direction, 0, 0);
    }
}
'Unity' 카테고리의 다른 글
| [Unity] 점수 적용하기 (2) | 2023.10.27 |
|---|---|
| [Unity] 빗방울 랜덤으로 자동 생성 (0) | 2023.10.26 |
| [Unity] 빗방울 추가 및 랜덤으로 빗방울 내리게하기 (0) | 2023.10.25 |
| [Unity] 게임 배경씬 및 캐릭터추가, 애니메이션 (0) | 2023.10.25 |
| [Unity] 유니티 설치 및 프로젝트 생성 (2) | 2023.10.24 |